参考资料:http://www.hackerfactor.com/blog/index.php?/archives/432-Looks-Like-It.html
很多时候,我们的文件夹里会有重复或者相似的图片,这类图片自然没有必要存在多份,我们要做的就是遍历所有图片,然后找出相似的,只保留其中一张即可。
这里的关键技术叫做”感知哈希算法”(Perceptual hash algorithm),它的作用是对每张图片生成一个”指纹”(fingerprint)字符串,然后比较不同图片的指纹。结果越接近,就说明图片越相似。
另外还找到了其他几种方法,这里是地址
http://www.ruanyifeng.com/blog/2013/03/similar_image_search_part_ii.html
第一步,缩小尺寸。
将图片缩小到8x8的尺寸,总共64个像素。这一步的作用是去除图片的细节,只保留结构、明暗等基本信息,摒弃不同尺寸、比例带来的图片差异。
在macOS,使用的是NSImage, 两者的一些操作很类似。1
2
3
4
5
6
7
8
9
10
11
12
13
14
15
16- (NSImage *)reSizeImage:(NSImage *)image toSize:(CGSize)reSize
{
NSImage *sourceImage = image;
if (![sourceImage isValid]){
NSLog(@"Invalid Image");
} else {
NSImage *smallImage = [[NSImage alloc] initWithSize: reSize];
[smallImage lockFocus];
[sourceImage setSize: reSize];
[[NSGraphicsContext currentContext] setImageInterpolation:NSImageInterpolationHigh];
[sourceImage drawAtPoint:NSZeroPoint fromRect:CGRectMake(0, 0, reSize.width, reSize.height) operation:NSCompositeCopy fraction:1.0];
[smallImage unlockFocus];
return smallImage;
}
return nil;
}
第二步,简化色彩。
将缩小后的图片,转为64级灰度。也就是说,所有像素点总共只有64种颜色。
第三步,计算平均值。
计算所有64个像素的灰度平均值。1
2
3
4
5
6
7
8
9
10
11
12
13
14
15
16
17
18
19
20
21
22
23a[ArrSize] = 0;
b[ArrSize] = 0;
CGPoint point;
for (i = 0 ; i < cursize; i++) {//计算a的灰度
for (j = 0; j < cursize; j++) {
point.x = i;
point.y = j;
grey = ToGrey([self NSColorToRGB:[self colorAtPixel:point img:imga]]);
a[cursize * i + j] = grey;
a[ArrSize] += grey;
}
}
a[ArrSize] /= (ArrSize - 1);//灰度平均值
for (i = 0 ; i < cursize; i++) {//计算b的灰度
for (j = 0; j < cursize; j++) {
point.x = i;
point.y = j;
grey = ToGrey([self NSColorToRGB:[self colorAtPixel:point img:imgb]]);
b[cursize * i + j] = grey;
b[ArrSize] += grey;
}
}
b[ArrSize] /= (ArrSize - 1);//灰度平均值
第四步,比较像素的灰度。
将每个像素的灰度,与平均值进行比较。大于或等于平均值,记为1;小于平均值,记为0。1
2
3
4
5
6
7
8
9
10
11
12a[ArrSize] = 0;
b[ArrSize] = 0;
CGPoint point;
for (i = 0 ; i < cursize; i++) {//计算a的灰度
for (j = 0; j < cursize; j++) {
point.x = i;
point.y = j;
grey = ToGrey([self NSColorToRGB:[self colorAtPixel:point img:imga]]);
a[cursize * i + j] = grey;
a[ArrSize] += grey;
}
}
第五步,计算哈希值。
将上一步的比较结果,组合在一起,就构成了一个64位的整数,这就是这张图片的指纹。组合的次序并不重要,只要保证所有图片都采用同样次序就行了。
得到指纹以后,就可以对比不同的图片,看看64位中有多少位是不一样的。在理论上,这等同于计算”汉明距离”(Hamming distance)。如果不相同的数据位不超过5,就说明两张图片很相似;如果大于10,就说明这是两张不同的图片。
代码实现
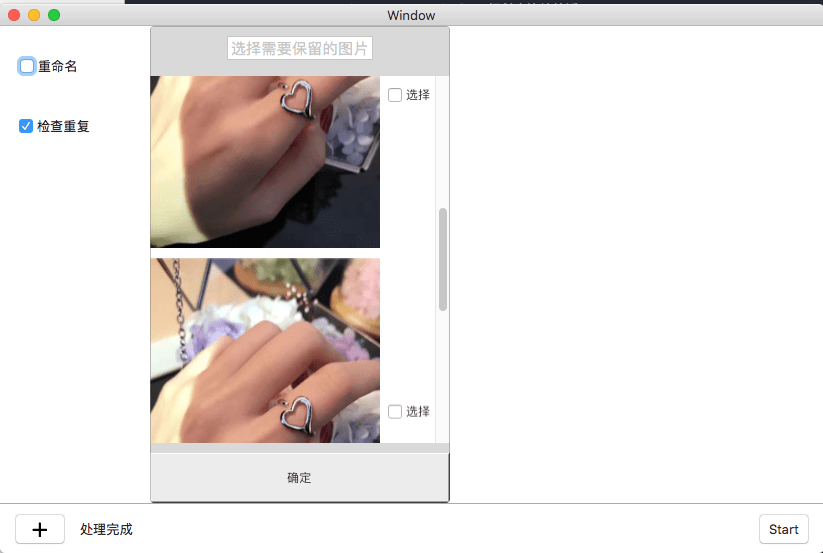
上面已经得到了判断两张图片是否相似的方法,而我们要实现的功能是:从一堆图片中找出哪些图片是相似的,并把相似图片放到一起。
实现逻辑:遍历所有图片,第一张图片先放到第一组中,第二张图片先与第一组中的第一张图片做比较,如果相似,就放到第一组中,否则放到第二组中,以此类推,直到遍历完左右图片,这时候,相似的图片都已经分到各个组中,有一些组中可能只有一张图片,表示没有与之相似大的图片,取出图片个数大于1的组,然后挨个显示这个组中的图片,让用户选择哪些图片该保留。
这是一个比较耗时的操作,所以放在子线程中操作。1
2
3
4
5
6
7
8
9
10
11
12
13
14
15
16
17
18
19
20
21
22
23
24
25
26
27
28
29
30
31
32
33
34
35
36
37
38
39
40
41
42
43
44
45
46
47
48
49
50
51
52NSMutableArray *totalArr = [NSMutableArray array];
__weak __typeof(self)weakSelf = self;
dispatch_async(dispatch_get_global_queue(DISPATCH_QUEUE_PRIORITY_DEFAULT, 0), ^{
for (NSString *filePath in allFiles) {
dispatch_async(dispatch_get_main_queue(), ^{
weakSelf.dealingLabel.stringValue = [NSString stringWithFormat:@"处理文件:%@", filePath];
});
if (totalArr.count == 0) {
NSMutableArray *arr = [NSMutableArray array];
[arr addObject:filePath];
[totalArr addObject:arr];
} else {
NSInteger groupCount = [[totalArr mutableCopy] count];
for (int i = 0; i < groupCount; i++) {
NSMutableArray *arr = totalArr[i];
NSImage *imagea = [[NSImage alloc] initWithContentsOfFile:arr.firstObject];
NSImage *imageb = [[NSImage alloc] initWithContentsOfFile:filePath];
Similarity simi = [PHCompare getSimilarityValueWithImgA:imagea ImgB:imageb];
if (simi >= 0.9) { //相似度比较接近
[arr addObject:filePath];
break;
} else {
if (i == [[totalArr mutableCopy] count] - 1) { //已经遍历到最后一组,还没有找到相似图片,新建一组
NSMutableArray *arr = [NSMutableArray array];
[arr addObject:filePath];
@synchronized(totalArr) {
[totalArr addObject:arr];
}
break;
}
}
}
}
}
NSMutableArray *repeatArr = [NSMutableArray new];
for (NSArray *arr in totalArr) {
if (arr.count > 1) {
[repeatArr addObject:arr];
}
}
dispatch_async(dispatch_get_main_queue(), ^{
weakSelf.dealingLabel.stringValue = [NSString stringWithFormat:@"处理完成"];
[self.checkRepeatView buildUIWithImageArr:repeatArr];
});
});
效果图: